See how basic clear glass bud vases from the thrift store can be transformed with just paint into distressed candlesticks to decorate your wedding or home on a budget.
CREATE | Updated November 27, 2023

It seems as though certain decor pieces are plentiful and found at any thrift store.
One such find is glass vases. They come in all different shapes, colors and sizes and normally are very cheap at around $1 or $2 each. This makes them ideal for repurposing into something else to decorate your home if you enjoy budget friendly craft projects.
Glass bud vases in particular are very easy to transform. They can be painted, distressed, and used to hold candles rather than just flowers. And best of all, the project can be customized easily making them fit in with any style.
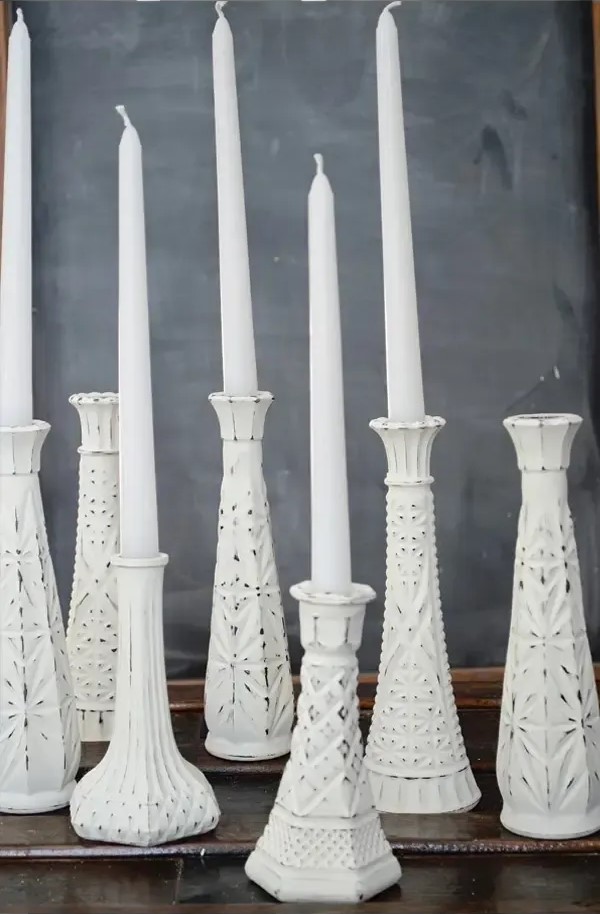
Let me show you how to recreate these unique candlesticks that I made from secondhand bud vases!
(Old picture frames are another thing to keep an eye out for. See how to use them to make a rustic farmhouse style tray.)

Why You'll Love this Project
QUICK TRANSFORMATION
While the project will take you some time to complete because you have to let each layer of paint dry, the actual work time that you'll invest is very minimal.
BUDGET-FRIENDLY
Glass bud vases are easy to find and normally quite inexpensive when shopping secondhand. You may even have some lying around unused at home!
CUSTOMIZED TO YOUR STYLE
Feel free to change up the colors or skip the distressing to make the candlesticks more "you."

What You'll Need
Want to try making these distressed candlestick vases yourself? Here's the supplies you'll need:
- clear cut-glass bud vases - While you can buy any bud vase that you like, just make sure that the top of the vase is narrow enough to hold a taper candle if that is how you intend to use the finished product. You can also follow this same idea using larger cut-glass vases or even repurpose secondhand liquor bottles with a cut-glass texture.
- paint - These vases are painted in layers so that the distressing reveals different colors of paint. My original project involved using tan and white chalk paint, but I now love to use Fusion Mineral Paint for my craft projects because it adheres to anything and requires no top coat for protection. I would suggest the colors of Algonquin and Casement.
- fine-grit sandpaper - Since this is a small project, you can also use a fingernail file if that is all you have available
- craft paint brushes - For added texture, try pouncing the paint on using sponge brushes
READ NEXT: Learn how to make your own DIY chalk paint.

How to Make Distressed Candlestick Vases
Now that you have all the supplies ready, let me walk you through the steps for making these shabby distressed candlesticks.
STEP 1: You'll want to make sure that your vases are clean and completely dry before you start working on this project.
STEP 2: Begin by painting the outside the vases with your base paint color. (For the creation of this post, I used Khaki Tan from Americana). This is the color that you'll see underneath the distressing.
You'll likely need to brush on three coats to completely cover the glass, allowing each to dry in between. Or if you'd like, use a sponge brush to pounce the paint onto the vase. This adds a nice amount of texture and will cover in two coats instead.

STEP 3: After the base coats of paint have dried, follow the same process to apply your top color of paint. (I used Warm White from Americana).
Again, you'll likely need three coats if you are brushing the paint on or two coats if you are pouncing it on with a sponge. Allow each coat to dry completely before adding the next coat.

STEP 4: When the candlesticks are completely dry, use fine-grit sandpaper (or a nailfile) to gently go over the raised portions of the vase. This will chip away some of the paint leaving a nice distressed finish. You can distress as much or as little as you'd like.
In some places the paint will chip down to the glass, but in others, it will leave the base color showing through making an interesting three-toned effect. It creates just the right amount of imperfection to make the candlesticks perfect and really one-of-a-kind.

STEP 5: Add some taper candles and your project is complete!


Variations to the Project
One of the best parts of making your own decor is that you can adapt projects to fit into your style, whatever that may be. Here are a few suggestions for changing up this idea:
- Paint the candlesticks any combination of colors that you'd like. While I love neutrals and find that white fits in with almost any decor, you can make these candlesticks in bright or muted colors as well. Choose two that are high contrast for the distressing or make them shades of the same color for a more simple look.
- If you aren't into a shabby distressed finish, feel free to skip this step and paint the vases in one solid color instead.
- Search for bud vases in different designs and sizes for a curated collection or gather vases in a single pattern for a more cohesive look.
- While the bud vases make perfect holders for taper candles, you can turn larger vases into pillar candleholders, too. As long as they are clear and have a cut-glass finish, the painting process will work on any glass vase.
- These "candlesticks" and the painting process itself can also be used to make unique decorations for weddings, receptions, and baby showers.

Frequently Asked Questions
Have some questions about making these shabby distressed candlestick vases? Here are some that are frequently asked to help guide you through the process. If you don't see your question answered here, feel free to reach out using the contact button at the bottom of the page.
WHY IS MY PAINT PEELING OFF BETWEEN THE LAYERS?
Paint has a tendency to peel when applied to glass if you don't give the layers adequate time to dry. What you are seeing peel away is the still wet paint. While this project doesn't involve a lot of work time, it is important that you allow plenty of time for the paint to dry in between the layers to ensure that it doesn't peel away adn so you get the smoothest finish possible.
DOES THIS PAINTED FINISH NEED TO BE SEALED?
Adding a protective finish over the top coat is a matter of choice. I love the texture created from the multiple layers of paint and the chalk painted finish so I didn't add a sealer layer. But if you would feel more comfortable using polyurethane, acrylic sealer or clear wax after you are done painting, feel free. Fusion Mineral Paint gives you a chalk painted finish without the neat for a protective top coat.
CAN YOU DO MULTIPLE PAINT COLORS UNDERNEATH THE TOP COAT?
I have never tried to do different colors of paint layered underneath the top coat, but I'd love to hear if this has worked for you. Trying won't hurt your candlesticks, but they may not distress enough to make it worth the extra effort.
CAN THE VASES STILL BE USED TO HOLD FLOWERS?
The painting process does not do anything to prohibit you from using the vases to hold water and flowers. But if you haven't added a heavy protective top coat, your painted finish may not withstand getting wet, especially around the opening of the vase.

I hope that this project has inspired you to update your own glass vases or to start a search for some at your local thrift store.
Other Repurposing Projects You Might Enjoy Making
DIY AGED STONE POTTERY TUTORIAL - Learn how to get the variations in color and texture on secondhand vases using just paint.
CHALKBOARD MESSAGE CENTER - Great for repurposing old picture frames without glass
RUSTIC CAKE STAND PEDESTAL - So easy with an aged pie tin and candlestick
HARDWARE CLOTH PICTURE DISPLAY FRAME - See how to add hardware cloth to a large picture frame for an ever-changing display of photographs
DIY DUTCH TULIP CRATE - A broken crate and hardware cloth are used to make a look-alike Dutch Tulip Crate inspired by Joanna Gaines
CREATING A BASKET OUT OF AN OLD KITCHEN POT
