
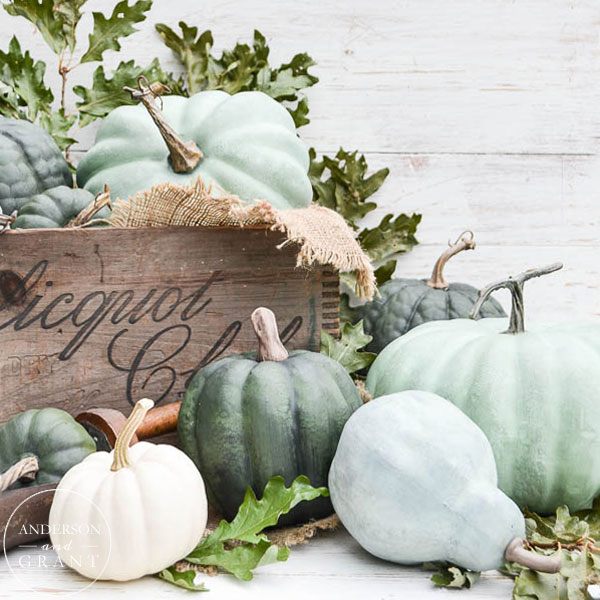
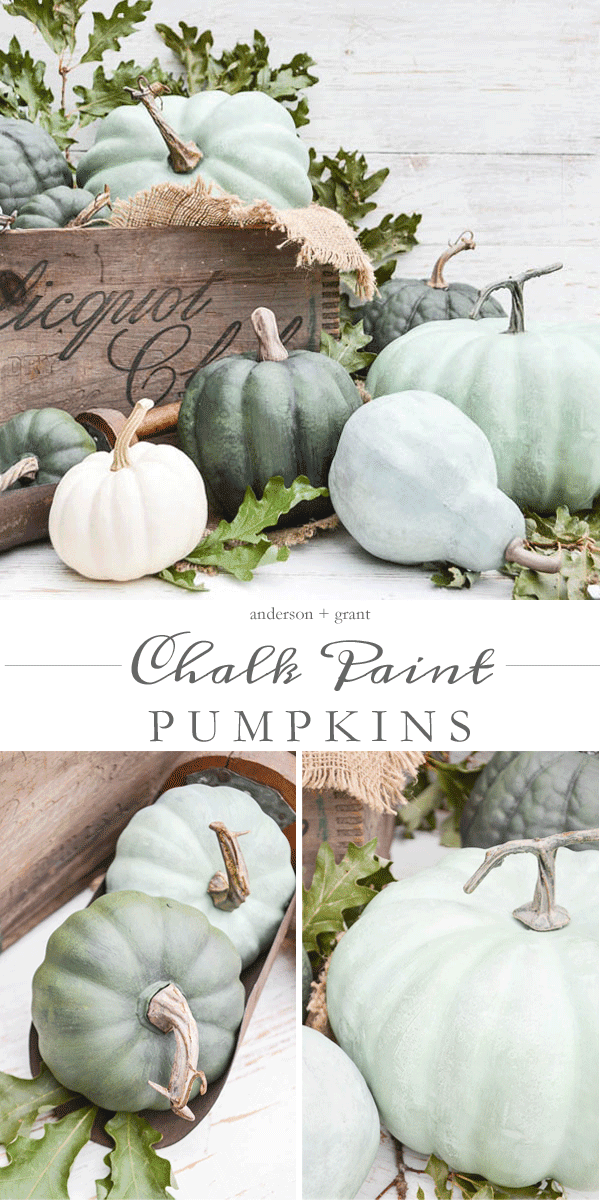
A must-try DIY Chalk Paint Pumpkins project for fall - Basic craft store pumpkins are updated with chalk paint in shades of green and an easy dry-brushing technique. They now have the texture and color variations of real heirloom pumpkins!
FALL | Updated September 17, 2023

Pumpkins are at the top of the list for must-have fall decor.
Even if you don't put out many things, you'll likely have at least a couple pumpkins (real or faux) tucked into vignettes or sitting on your porch. They are one of the icons of the fall season.
Heirloom pumpkins are becoming more and more popular and are a little more special to decorate with over ordinary jack-o'lantern style. They typically have more muted tones which fits in well with the current home decor trends. They have unique shapes and characteristics like bumpy rinds. And they are nostalgic....they are the types more commonly seen many years ago.
This post contains affiliate links which means I receive a small commission if you choose to make a purchase using the link, but there is no additional cost to you. For more information, you can view my disclosure policy.
My Pumpkin Decorating Dilemma
I will admit that I have a few (personal) issues when it comes to decorating with pumpkins.
- For one thing, unless you grow them yourself, stocking up on a pile of pumpkins (especially heirloom pumpkins) gets really expensive. And then you throw them away at the end of the season.
- I am all about using fake, plastic pumpkins, but......they need to look like the real thing. And let's be honest, there are very few pumpkins available at a reasonable price point that look natural. They are paint spattered, brightly colored, and don't even get me started on the faux stems. (I did come up with my own solution for that problem, though.)
- And finally, almost all of the DIY painted pumpkin tutorials I find to fix the aforementioned problem leave me feeling like I'm still looking at a plastic pumpkin. I realize this is a personal problem, and I know that I am too much of a perfectionist, but when I DIY something, I want it to be very similar to the real thing.
This year, I've been busy working on a dry brushing technique that begins to make me feel a bit better about painted craft store pumpkins and I wanted to share the project with you, just in case you're like me and searching for a way to make those pumpkins look just a bit more real. You might not be mistaking them for a real heirloom squash, but they are close.

What Is Dry Brushing?
In keeping with my neutral theme for fall, I wanted to make some pumpkins in different shades of green. I love the texture created from chalk paint, but after painting them, they looked so plain. So I took the painting process on step further and dry brushed an accent color over the top.
Dry brushing is when you add paint to your brush, then brush most of it off onto a piece of paper towel. What remains can be brushed quickly and haphazardly onto your piece. Your brush is basically dry with just a hint of paint left that can be transferred onto whatever you're painting.
You'll want to use a brush that you don't mind throwing away or reserving just for projects like this because it will really take a beating.
Really rub the brush in and all around to smooth it all out. If you happen to get too much paint in an area, just add a bit of the base color back on to what you're painting to even out the finish. Dry brushing isn't meant to get down into the cracks and fully cover, but rather just highlight texture on the surface and accent with a different color.
I love how this simple step takes plastic pumpkins from looking like they've been painted to actually have the texture and color variations of a real pumpkin. No two pumpkins are ever going to look alike or turn out exactly the same. Each one is unique.
READ NEXT: See the same dry brushing technique used to update an old planter giving it the look of real aged pottery!

DIY CHALK PAINT PUMPKINS TUTORIAL
Supplies You'll Need
- assorted foam pumpkins - I love looking at Hobby Lobby, Michaels, and JoAnn Fabrics during their end of the season clearance sales to get pumpkins for the next year. Look for shapes and sizes you love and don't be swayed by the look of their paint job.
- paint - Fusion Mineral Paint is typically my choice for DIY projects, but back when I created this post, I made my own DIY chalk paint using craft store acrylics that I had on hand. The "recipe" appears below.
- primer
- paint brushes
- paint palette - i use an old dinner plate from the thrift store that I can wash off and use again, but a foam or paper plate works, too
- paper towel or rag
- glue
- real pumpkin stems - (optional) I like to break the tops off of whatever real pumpkins or squash I get in the fall and use them for projects the next year. You can also find different shapes and sizes of dried pumpkin stems on Etsy.
How to Make DIY Chalk Paint
If you'd like to have the texture of chalk paint without paying the added price tag, you can make a DIY version yourself at home.
In a small dish, you'll need to combine 2 Tablespoons Plaster of Paris with 1 Tablespoon water. Mix it well eliminating any lumps, then add it to 1 cup of water based paint and stir or shake it well.
For this post, I was using 2 ounce bottles of craft paint, so the correct ratio for this amount of paint would be 1 teaspoon Plaster of Paris and 1/2 teaspoon of water. Carefully add the mix to the bottle and shake well.
Check out this post for more helpful tips about creating your own chalk paint and how to use it.

DIY Chalk Paint Pumpkins Tutorial
I started with random, unmatched pumpkins picked up last fall on clearance from Hobby Lobby. They were incredibly bright and not at all what I was looking for this year, but I knew that could be easily changed.
STEP 1: Before you start painting, you'll want to pop the tops off of your pumpkins. It is hard to not get paint on the stems while you're working on this project so removing the stems will save you clean up time later on. They should be able to twist right out and you can glue them back into the foam when you're done.

STEP 2: PRIMER Because colors like orange and red are hard to cover with a light colored paint, I started this project by basecoating all of my pumpkins with Fusion Color Blocker (now called Transition). While this does not prevent against bleeding colors (you'll want Bin shellac based primer for that), it helps you cover up the darker colors without wasting too much pricey paint. It is a neutral gray color and is made with recycled pigments that are leftover during Fusion's paint making process.

STEP 3: PAINT Next you'll want to paint your pumpkins with chalk paint. For this post featuring the green pumpkins, I used Folk Art brand craft paint in the colors Sea Glass and Avocado. You'll most likely want to do two coats to get a good solid color on your pumpkin.

STEP 4: DRY BRUSHING - Now comes the fun part....Dry brushing the pumpkins to give them more character and texture! You'll want to use a craft brush that can be thrown away later, because it will take a bit of abuse with all the rubbing and brushing. But it is so worth it!
For the mint colored pumpkins, I used avocado to dry brush on top. For some, like the small gourds in the picture I also added a bit of gray when brushing to change the color a little. The dark avocado pumpkins were shaded with black. Even though the colors may seem dark, you're not adding a lot at one time or in a heavy layer. It needs to contrast with the base color in order for the dry brushing to be worth the added effort.
Really rub the brush in and all around to smooth out the color. If you should happen to get too much paint in an area, add a bit more of your base color onto the pumpkin to even out the finish. You can also dip the tip of your brush into some clean water to if you notice the paint is going on too thick. Dab the pumpkin's surface with a clean paper towel if it is too wet.
Focus on adding depth in between the dips in your pumpkin (like I did on the dark green varieties) OR highlight the outer rounded edges with your dry brushing (like I did on the mint pumpkin). If you are dry brushing randomly all over you won't get the same effect.

STEP 5: ADD YOUR STEM Once your pumpkin is dry, you'll want to either glue your original stem back onto the pumpkin, add a real stem, or follow my tutorial for a DIY a realistic-looking stem using twine, cinnamon, and mod podge!


I'm showing my pumpkins here around a vintage wood crate, but you can tuck one in just about anywhere for a display. Add some dried leaves or mix in some real pumpkins (like my white one) to put the finishing touch on your creation!


Frequently Asked Questions
CAN YOU PAINT PUMPKINS A DIFFERENT COLOR?
For this post, I focused on just green "heirloom" pumpkins, but you can paint yours whatever color you'd like. For example, Tuscan Orange from Fusion is a great color that can be dry brushed to resemble a light colored fairytale variety or used as is for a traditional looking pumpkin. Look for inspiration on pinterest to see what real pumpkins you'd like to DIY and choose a contrasting shade to add texture and depth.
CAN THESE PUMPKINS GO OUTSIDE
I wouldn't suggest placing these painted pumpkin out in the weather. A covered porch or something with an overhang should be fine, though. Look for outdoor paint for best results and be sure to add a few coats of a polyurethane sealer on top to protect your hard work.
WHAT IF I DON'T LIKE THE WAY THE PUMPKIN LOOKS
Dry brushing a color on top takes a little getting used to. The good news is that you can't mess the project up!
If you really hate what you've done, paint another layer of your base coat and start again. But the secret really is to keep layering on and brushing. Add a little water and dab your paper towel on your pumpkin to smooth things out. Add a little more paint. Add a different contrasting color for even more variety.
I find that the more I mess around with the pumpkin (or whatever I'm dry brushing) the better it turns out. And don't think that everything has to look exactly the same. You'll never be able to fully replicate what you do from one pumpkin to the next, but that is what keeps your homemade version from looking like it was produced in a factory!

More Fall DIY Projects You Might Enjoy
- Pick Your Own Pumpkins Hand Painted Sign
- Dried Oak Leaf Wreath
- Pumpkin Planter Box Tutorial
- Hand Painted Pumpkin Crate

Whether you have some old pumpkins you want to spruce up or go out an buy a few new, these DIY chalk paint pumpkins are sure to add a beautiful homemade touch to your fall decor.

MONDAY
Cherished Bliss | Live Laugh Rowe | Paint Me Pink
TUESDAY
Blesser House | House By Hoff | Craftberry Bush
WEDNESDAY
Setting For Four | Little Glass Jar | anderson + grant
THURSDAY
Meadow Lake Road | At The Picket Fence | Thistlewood Farms
FRIDAY
Tidbits | Dandelion Patina | Rustic and Woven