
Learn how to paint layers of acrylic paint on plastic pumpkins to DIY Fairytale Pumpkins that look just like the real muted thing....No trip to the pumpkin patch required and perfect for decorating your front porch for fall!
FALL | Updated July 8, 2025

FALL | Updated July 8, 2025
Whether real or fake, pumpkins are a must have when decorating for the fall season.
There is something quite charming about seeing porch steps lined with a variety of pumpkins inviting you to the front door. Or having a small collection gathered at the side of the hearth.
If you are looking for some realistic plastic pumpkins to either mix in with the real or use on their own, this post is for you. You'll no longer have to visit the farmer's market to pick up a few fairytale pumpkins as long as you are willing to do a little DIY.
This post is going to walk you through the step-by-step process I took to transform some brightly colored fake pumpkins with a layered paint treatment to resemble the muted heirloom variety of squash. Attach a real stem and no one will ever know that your pumpkins weren't just harvested from the fields!

What Are Fairytale Pumpkins
Fairytale pumpkins are a French heirloom squash that can be eaten, but are often sought after for fall decorating.
They are large and flatter than an ordinary bright orange pumpkin and have a more muted, almost brown tone to the skin. Most times they seem to have the look of having a white chalky wash brushed over them.
Because they have a neutral shade and a romantic appearance, the fairytale pumpkins are used a lot in decorating porches and interiors during the autumn months. They create a welcome contrast when paired with traditional orange pumpkins and white pumpkins.
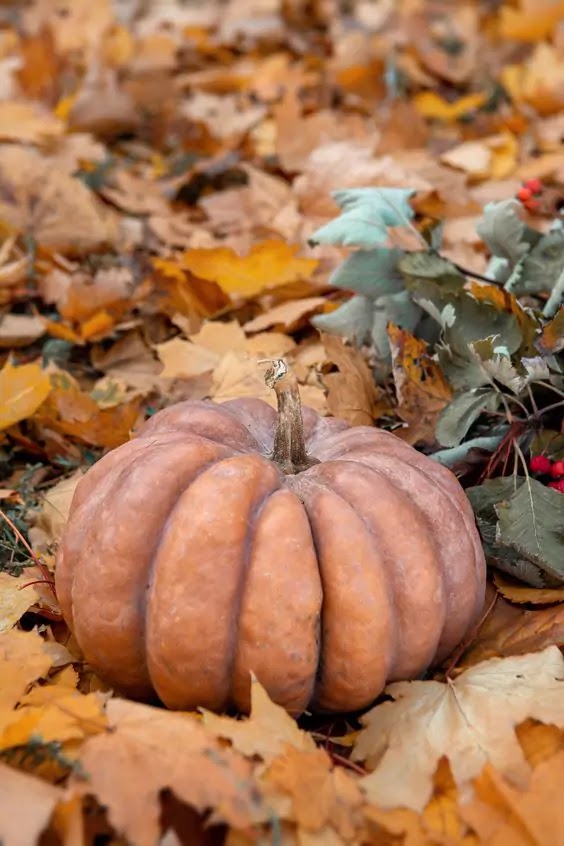
PHOTO CREDIT: Shutterstock
Why Would You Paint Plastic Pumpkins?
Since Fairytale pumpkins are becoming easier to find you may be wondering why you would bother taking the time to paint plastic pumpkins to resemble the heirloom variety. Here are a few reasons:
EASY FALL CRAFT PROJECT
For many of us, we simply enjoy creating and want to use our own two hands to create something unique.
Painting faux pumpkins, even with the added dry brushing technique you'll use here, is not a difficult job. It can be quite relaxing and enjoyable to watch brightly colored pumpkins be transformed into something more suitable for your current decorating style.
HEIRLOOMS CAN BE EXPENSIVE + HARD TO FIND
Even though they are not as difficult to find as they once were given their growing popularity, fairytale pumpkins still aren't available everywhere and most times are much more expensive than traditional jack-o'lantern style pumpkins.
Unless you grow your own, you may have to consider the DIY version due to budget constraints or availability.
USE THEM YEAR AFTER YEAR
It sometimes feels like a shame to spend a lot of money to make your porch look beautiful for the fall, only to turn around and have to dispose of the pumpkins at the end of the season. (Although as I mentioned above, you can use the fairytale pumpkins to make puree for pies and other sweet and savory foods.)
But when you decorate with fake pumpkins, they can be stored and used again and again. Or until you decide they need another makeover!
UPDATE THE PUMPKINS YOU NO LONGER LOVE
We probably all have a few faux pumpkins that just aren't "in style" any more. Maybe you don't love the colors or they look a little too fake for your taste. If you don't have anything like this at your own house, you'll likely find some at yard sales or thrift stores. A DIY paint treatment is ideal for transforming what might otherwise be discarded.
If you need more pumpkins for next year, keep an eye out at stores like Hobby Lobby and Michaels at the end of the season because they normally have the leftover stock being sold for next to nothing.

Supplies You'll Need
- Faux Pumpkins - There are many shapes and sizes available, but try to find some that are large and flatter than the traditional shaped varieties for a more realistic look. While you can certainly give any pumpkin this paint treatment, an authentic fairytale pumpkin will be wider than it is tall and have deep ridges.
- Real Pumpkin Stems - You can reuse the faux plastic version that you remove before painting or add a real stem to the top for an even more realistic look. Save the stems off of your real fall pumpkins and squash or real pumpkin stems can be purchased on Etsy.
- Glue - Use hot glue or ordinary craft glue to attach the pumpkin stem.
- Craft Paint - I used mostly Fusion Mineral Paint for this project, but you can use whatever acrylic craft paints you have on hand. Look for something that is a traditional pumpkin orange shade, a coral colored peach, and burnt umber (very dark brown). If you are using Fusion Mineral Paint, look for the shades Tuscan Orange, Coral, and Chocolate.
- Foam Pouncer - Optional, but I love the added texture the pumpkins get when using these to apply the first layers of paint. The ones I am using here are no longer available, but these sponge applicators should work just as well.
- Craft Paint Brushes
- Clean Rag or Piece of Paper Towel
- Dish or Water
- Hairdryer - Optional, but it works great for speeding up the paint drying process

How to DIY Your Own Fairytale Pumpkins
Now that you have all the supplies ready, it is time for the fun part....getting those pumpkins painted. Here are the steps that I took to transform brightly colored faux pumpkins into muted heirlooms.
This is a layered paint treatment that requires a few steps, none of which take too long, but does require some drying time in between. Keep a small dish of water and rag close by to aid in blending the different layers of paint.
REMOVE THE FAUX STEM
Carefully twist the plastic stem from the foam pumpkin to remove it. They are sometimes glued in but normally have a small plastic piece that fits down into the foam that can be pulled out. Set the stem(s) aside to glue back to the top after the pumpkins have been painted or discard if you plan on adding a real stem.

PAINTING YOUR PUMPKIN
For these instructions, I'll be using the Fusion Mineral Paint names for consistency, but feel free to use whatever type of paint you have on hand.
Step 1: Basecoat your pumpkin with Coral.
I used a foam pouncer to apply the paint. While it isn't necessary, these foam paint applicators add a great texture to the outside of the pumpkins that not only adds to their "real" look, but aids in the dry brushing treatment later on in the project.
Your pumpkins will likely need two coats of Coral to be fully covered. You'll either have to paint the pumpkins in two stages, top and bottom, or use a hairdryer to speed up the drying process.

Step 2: Brush Tuscan Orange onto the pumpkin.
It is okay if this coat doesn't cover the Coral thoroughly. That adds to the layered look in the end. You can move on to the next step even if the paint has not completely dried as you can sometimes blend better when this coat is still a bit wet.

Step 3: Now you are going to add shading with the Chocolate.
You're going to be dry brushing the paint on. Instructions appear further down in the post if you are unsure of how to do this.
For the sake of showing you how and where to apply the paint, I am adding the paint full strength and not blending in the image below. Be sure to blend well so that the paint creates depth without looking like you've painted stripes around the pumpkin!
You may need to put a little water on your brush to get it to blend seamlessly. Focus on adding the Chocolate to the inside of the ridges around the entire pumpkin and blending into the raised areas just enough to look natural.
You may want to add a little around where the stem goes into the pumpkin as well.

Step 4: Now is where the real "texture" and look of the heirloom is going to be made.
Dry brush Coral over the entire pumpkin. You do not want to actually paint the pumpkin or you'll loose the depth created with the layers of paint. Rather, you want to remove most of the Coral paint from your brush and just gently skim the bristles over the surface of the entire pumpkin. This is where the added texture created in Step 1 comes in handy. The Coral dry brushing should rest on the raised texture.
If you find the paint is going on too heavy, dip your brush in the water and use the moisture to smooth out the paint. Use your rag to remove the excess moisture.

Step 5: Now go back over the pumpkin with all three shades to add more depth and highlighting.
Dry brush on more Chocolate in the insides of the ridges where you need more shading. Add more Tuscan Orange where you want to remove some of the lighter wash, and dry brush more Coral where you want to add more highlighting. I added some Coral dry brushing overtop the brown shading, too, to bring make the pumpkin look cohesive.
Keep going around the pumpkin playing with the paint finish until you get the look you desire. No two pumpkins will ever look the same and this step will likely take you the most time to get right.
Use the image above of the real pumpkin as inspiration or do a search on Pinterest or Google to find versions you'd like to mimic. The secret to making faux things look realistic is to observe the real thing.

REATTACH THE STEM
Once your pumpkin has dried completely, it is time to attach your stem. Even if you are reusing the plastic version that you removed, you'll want to use glue to make sure that everything is secure.

How to Dry Brush Paint
Dry brushing is a painting technique that will really add a realistic look to these plastic pumpkins.
It is done by adding paint to your brush, and then brushing most of it off onto a piece of paper towel. What remains is then brushed quickly and haphazardly over your piece sticking mainly to any areas with raised texture.
Your brush is basically dry with just a hint of paint left that can be transferred on to whatever you're painting.
Really rub the brush all around to smooth the paint out. If you happen to get too much paint in an area, just add a bit of the base color back on to what you're painting to even out the finish. Or try adding a small bit of water to remoisten the layers of paint and remove the excess with a clean rag or piece of paper towel.
Dry brushing isn't meant to get down into the cracks and fully cover, but rather just highlight texture on the surface.
I love that this step takes a plastic pumpkin from looking like it has been painted to having actual texture and color variations like a real pumpkin leaving each one looking unique, just as you'd find in nature.
READ NEXT: How to DIY Green Heirloom Pumpkins

Frequently Asked Questions
You may have some questions about this layered paint treatment as you work on your pumpkins. Feel free to email me for help or use the contact link at the bottom of the page. Here are the answers to a few questions that people have commonly had.
DOES THIS PAINTED PUMPKIN NEED TO BE SEALED
It depends on where you are going to use it. If the pumpkin will be going outdoors where it will be exposed to the elements, you'll definitely want to seal it with a coat of matte polyurethane for protection of the finish you worked hard to create. It will likely need to be resealed each year.
If you are going to be keeping the pumpkin indoors, it doesn't need to be sealed (especially if you used Fusion Mineral Paint as it has a built-in top coat). You can also use clear furniture wax to add a nice sheen to the painted pumpkin.
CAN THE PLASTIC PUMPKIN STEM BE PAINTED
If you are not adding a preserved pumpkin stem to the top, feel free to spruce up the faux stem just like you did the pumpkin. You may want to use a few different brown and tan shades to create a realistic look.
You can also check out this post about how to create a realistic stem using jute twine, Mod Podge and cinnamon!
WHEN PAINTING MULTIPLES, IS IT BETTER TO PAINT ONE START TO FINISH OR WORK IN AN ASSEMBLY LINE FASHION
When painting more than one pumpkin, it is up to you whether it would be best to finish one pumpkin before moving on to the next or to do each step on all the pumpkins at the same time.
I've found that when doing multiples of anything, I get the most consistent results if I do the same thing to each pumpkin before moving on to the next step.
But if you would feel more content getting one completely done knowing the next might turn out differently, feel free to do that! You know how you like to craft best.

Whether you paint one single Fairytale Pumpkin to add to your decor this year or you do an entire mini patch for an eye-catching display, I hope that you'll enjoy creating something for fall that you can use again each year.
And possibly fool your friends into believing you went to the pumpkin farm!
More Fall DIY Posts You Might Enjoy
How to Make Realistic Looking Pumpkin Stems - A great DIY way to make realistic stems for your faux pumpkins using jute twine and Mod Podge.
'Pick Your Own Pumpkins' Hand Painted Sign - With a free pattern so you can make your own.
Dried Oak Leaf Wreath
How to Paint Realistic Green Heirloom Pumpkins - If orange pumpkins aren't your thing, why not try some DIY green heirlooms for a more neutral color palette.
'Pumpkins for Sale' Crate - An easy DIY painted design that can be used on a sign or repurposed wood objects.
