Easy tutorial for turning old, dated bead garland into something fit for your modern day Christmas tree using metallic Rub 'n Buff wax.
CHRISTMAS | Updated November 25, 2023

Are there ever times that you feel your Christmas décor could use a little refresh?
Maybe the colors are dated or the condition isn’t what it used to be?
Giving a small makeover to things still worthy of display, but that you aren’t in love with anymore, is a great way to save money, get a fresh new look for the holiday decorating season, and give your creative muscles a workout.
This easy Christmas DIY project is going to show you how a garland of brightly colored large beads was transformed into a timeless, antique-inspired gold version that is right on trend for this year’s Christmas decorating and can be used in numerous ways around your home.
This post contains affiliate links which means I receive a small commission if you choose to make a purchase using the link, but there is no additional cost to you. For more information, you can view my disclosure policy.

HOW TO MAKE A DIY GOLD BEADED CHRISTMAS GARLAND
What Kind of Garland Can I Use?
This process can be used on any type of bead garland: new or old, wood or plastic, large beads or small beads (although small will be a lot more work!), and any length of garland.
What was used here was nine-foot long large beads that were in a lime green shade. I purchased them from a Christmas store going out of business with the plan to turn them into something stunning and more my style.
You may have a few old strings lying around or you can search Goodwill and other secondhand stores. As long as the beads are the same size, you don’t even have to have matching garlands to start with if you want multiple strands because they are going to be painted!

What Other Supplies Do I Need?
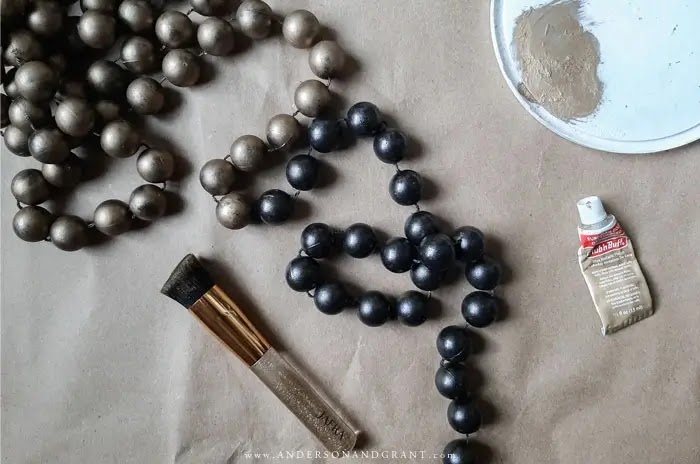
In addition to the string(s) of beads, you’ll need a tube of Rub 'n Buff Wax Finish (I used European Gold), a metallic black or oil-rubbed bronze spray paint, and a stiff brush (A stiff make-up brush works really well, but you won’t be able to use it again for make-up).
The Rub 'n Buff goes a long way – I was able to do eleven nine-foot garlands with one tube. It works really well on picture frames and other craft projects, too.
A supply list and links to where you can purchase the products appear further down in the post.
How Can This Garland Be Used in My Home?
Sometimes part of the problem with the décor available on the market is we don’t know what to do with it when we bring it home. Or we are tired of using it in the same way year after year and would like a new way of using what we have.
Beaded garlands can be used in many ways throughout your home at Christmas time. While they are normally strung around your Christmas tree, they also are a nice accent hanging from greenery over a mantel or down the railing to a staircase. The empty space over your kitchen cupboards also looks nice filled with greenery and the draping beads.
If the string can be cut into smaller sections, display some of the beads falling out of a decorative bowl filled with greenery and pine cones or lay it over the arms of the light fixture hanging over the dining table.

Gold Isn’t My Style…. What Else Can I Do to Makeover Old Christmas Beads?
Some people love gold, especially at Christmas, and others don’t like the metallic shade at all. You should always aim to buy or create décor that fits into YOUR style and not what anyone else says is the must-have of the season.
- For this tutorial, I used Rub 'n Buff in European Gold, but they also sell it in silver, pewter, copper, and ebony, in addition to other shades of gold. (I've linked to all the colors here on Amazon.) For some vendors, you’ll have to search for the specific color you want because different shops sell different colors. Also, you may want to use a different spray paint color to better coordinate with the metallic finish of your choice.
- Another suggestion would be to use a specialty spray paint and skip the metallic look altogether. A few coats of a stone-finish spray paint would give a nice texture to the beads. Or look for Rustoleum’s Glitter or Chalked lines for a finish that might be more your style.
What is Rub ‘n Buff?
Rub ‘n Buff is formulated from Carnauba waxes, fine metallic powders and pigments for a finish that is unlike anything with a painted surface. It comes in a tiny tube and you simply rub it onto a clean surface and then buff it to a luster for a special gilded look.
This is a great post explaining what it is, how to use it, and the colors available.
I Am Not Interested in Making My Own Garland…. Where Can I Buy One Instead?
While I love transforming and creating, not everyone feels the same way or doesn’t have the time. If you are interested in purchasing one of these beaded garlands, they are available in my online shop.

DIY GOLD BEADED GARLAND TUTORIAL WITH RUB 'N BUFF
SUPPLIES
- Beaded Garland
- Rub 'n Buff Metallic Wax, European Gold
- Rustoleum spray paint, Oil-Rubbed Bronze
- Stiff make-up brush
- Clean soft cloth
INSTRUCTIONS
STEP 1: Spray your garland with the spray paint. It is okay if you miss small spots here and there because you’ll be covering them with the wax. But try to get a good solid coat.
This layer of paint is important because it gives the Rub 'n Buff a nice surface to adhere to and you’ll want some of this darker color showing through in areas on the beads to give the appearance of age.
If you have a place to hang the beads, like a clothesline, it makes spraying everything at once a lot easier. I tried laying them out, hanging them, and coiling the beads into a circle and found hanging to be the most efficient method.
Give the paint at least a few hours to dry. I suggest overnight.

STEP 2: Lay down something to protect your work surface because this project will create some metallic “dust.” Dispense a little of the Rub 'n Buff from the tube. I used a lid from a plastic container to hold the wax I was using. Don’t use something that can’t be thrown away when you are done.
STEP 3: Put a little bit of the wax onto your brush and rub it in circles onto the beads, leaving some areas without full coverage allowing the spray paint layer to show through.
Once the wax is on the bead, it isn’t going to come back off or spread across the beads. So, use less than you think you might need and add more if necessary.
Continue this process with each individual bead until they have all been covered. This nine-foot long garland took about 40 minutes to do with the Rub 'n Buff. It is a great project to work on while watching TV!

STEP 4: (Optional) When the entire string has been done allow it to rest for about 30 to 45 minutes and then rub the beads with a soft cloth to buff to a beautiful luster.
STEP 5: Use the garland in whatever way you’d like and then after Christmas be sure to pack it away carefully in bubble wrap or tissue paper so that the finish is protected.

This project will likely take you about an hour excluding drying times for a nine-foot string, but you’ll end up with a beautiful, one-of-a-kind garland you can use for years to come!
While you can always go out and buy something new that catches your eye, it can be very rewarding to repurpose things you already have and give them a second chance at having a decorative life.
CONTINUE READING THESE CHRISTMAS DIY POSTS IF YOU'RE INTERESTED IN CRAFTING HOMEMADE DECOR THIS HOLIDAY SEASON:
DISTRESSED NOEL SIGN
FAUX BOXWOOD WREATH TUTORIAL
NO-SEW BURLAP TABLE RUNNER

