
Learn how to create an easy DIY preserved leaf tree to bring a bit of nature indoors to decorate your home for fall.
FALL | Updated May 2, 2023

FALL | Updated May 2, 2023
Nature provides the ultimate access to decor for your fall decorating.
I've become a little obsessed with collecting bits of the outdoors lately on walks through my neighborhood.
Acorns
Leaves
Branches
Pine cones
I feel a bit like a crazy squirrel running around gathering supplies to stock up for winter.
It is easy to fall in love with the simplicity of decorating with these items for fall and they became the inspiration for today's post.
READ NEXT: Preserved Oak Leaf Wreath Tutorial

Do you ever feel like the world has become noisy with lots of distractions to take you away from enjoying the little things in life? You lose sight of what is right in front of you, like a chirping bird outside the window or the kindness of a stranger. In the hustle and bustle we call living, those simple but meaningful things get ignored. To refocus, I find that taking a quiet stroll through my neighborhood can do wonders and put my mind at ease.
Last week on one of these afternoon walks, I was lost in my thoughts under the oak trees and didn't seem to notice acorns were literally falling from the sky until one just about hit me in the head.
That is when I stopped to really take in what was around me. Littering the ground were acorns, leaves, and branches showcasing the beauty of nature. This beauty is fleeting, though, and will be destroyed if left out in the sun, wind, and rain. It can only last if preserved and taken care of. With that realization, I knew exactly what I could create.

During the fall last year, those same trees had begun loosing entire branches full of leaves and as they dried alongside the road they faded into the most incredible shade of green. I had gathered a bunch and brought them home to dry. (You may have seen some in mydecorated mantel post here a few weeks ago.) I pulled out the box filled with the rest of what had been gathered and started crafting.
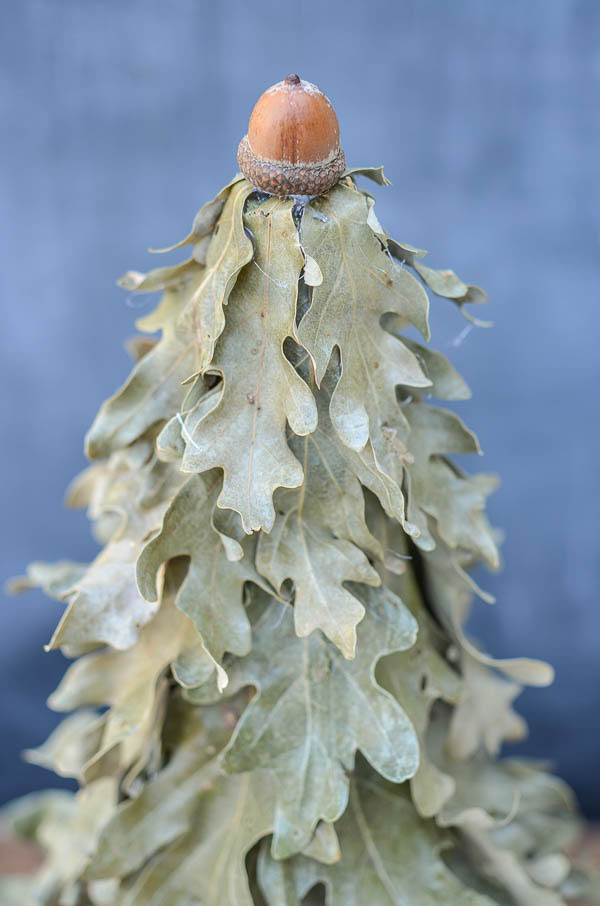
What I came up with was a tree covered in the preserved green oak leaves and topped with an acorn. It is truly the perfect way to bring a piece of the fall indoors with you. The beauty of the shape and color, the fresh smell, the feel of the crispness of the leaf. All reminders of the fall season.

Supplies You'll Need
There is a full list of supplies and detailed instructions near the end of the post, but here is a basic idea of what you'll need to construct one of these fall trees for yourself:
- leaves - either gathered directly from outside and preserved or ones purchased from the craft store or online shops like Etsy. While I chose these green oak ones to fit into my fall decor this year, you could use any color or type of leaf.
- one acorn
- styrofoam cone - you can also use poster board that has been rolled into a cone shape
- glue - I used hot glue to get the project done quickly, but I'm not sure how well it will hold up over time. If you have the time to work with your tree, it would be best to use craft glue.
- craft paint - to match whatever color your tree will be. You don't want any of the white peeking through in places that might not have a leaf covering it.

How to Make a Preserved Leaf Tree
STEP 1: I began the project by painting my styrofoam cone with a sage green craft paint and allowed it to dry.
STEP 2: Since my leaves were from last year, they needed to be rehydrated and made pliable. I laid the leaves out on a sheet of wax paper and spritzed them with water. They sat for about half an hour and became easy to bend and shape again. If you try to attach the brittle leaves, they will crack and break as you work with them.
If your leaves are freshly gathered, this step can probably be skipped.

STEP 3: I covered the bottom portion of the tree completely with leaves. The leaves used here don't have to be the prettiest and can even be broken pieces. Their purpose is to ensure that the entire bottom third of the cone is completely covered.
STEP 4: Then I began layering leaves over the base going around in circles and working my way up. I used the largest leaves on the very bottom, medium for the middle, and saved the smallest leaves for the top.
For this bottom level, I glued both the top and a section of the bottom of the leaf to the cone. As I worked my way up, I just attached the leaves at the stem end. This allows the leaves to maintain the natural curl that develops around the edges as the leaves dry.
STEP 5: At the top of the tree, I allowed the leaves to extend past the top of the cone just a bit. They were folded over to completely cover the tip of the cone and then I glued the acorn on the top to finish everything off.
Since I still have some leaves left, I'm planning on making another smaller version of this tree. It looks pretty to see things like this in different sizes in a display. The tree also looks really great sitting on a candle holder in a vignette.
Creating this tree is a simple yet beautiful way to preserve a piece of fall to enjoy long after the leaves have fallen from the trees.
It should last for years if it is properly stored. And much like preserved boxwood, you may want to spritz it with water about every month while you have it out to keep the leaves from drying out too much.
When I look at my preserved leaf tree, it is a simple reminder to slow down and look at the beauty of life that is surrounding us all. What ways are you finding to enjoy this fall season?
WANT TO TRY PRESERVING YOUR OWN LEAVES FOR PROJECTS LIKE THIS ONE?

DIY PRESERVED LEAF TREE TUTORIAL
SUPPLIES
- Preserved leaves
- Acorn
- Styrofoam cone
- Hot glue
- Craft paint (in the same color as your leaves)
INSTRUCTIONS
STEP 1: Begin by painting your cone with the craft paint and allow it to dry.
STEP 2: The leaves need to be rehydrated and made pliable before gluing them onto the cone. If you try to attach the brittle leaves, they will crack and break as you work with them. Lay the leaves out on a sheet of wax paper and spritzed them with water. Allow them to sit for about half an hour so they became easy to bend and shape again.
STEP 3: Cover the bottom portion of the tree completely with leaves. The leaves you use here don't have to be the prettiest and can even be broken pieces. Their purpose is to ensure that the entire bottom third of the cone is completely covered.
STEP 4: Then begin layering on leaves over the base going around in circles and working your way up. Use the largest leaves on the very bottom, medium for the middle, and the smallest leaves for the top. For this bottom level, glue both the top and a section of the bottom of the leaf to the cone. As you work your way up, attached the leaves at just the stem end. This allows your leaves to maintain the natural curl that develops around the edges as the leaves dry. Be sure that you are completely covering the cone.
STEP 5: At the top of the tree, allow the leaves extend past the top of the cone just a bit. Fold this part over to completely cover the tip of the cone and then glue the acorn on the top to finish everything off.