
Learn how to create a primitive hand painted Pumpkins for Sale sign for decorating your porch for fall using this tutorial and free pattern.
FALL | Updated October 1, 2023

A hand painted sign adds the right amount of rustic charm to your fall decorating.
Even if you aren't "crafty" or consider yourself a decorative painter, painting a simple sign using a template and step-by-step instructions isn't too hard. And sometimes the more primitive your skills, the better a sign like this turns out!
While this tutorial shows the painting on the side of a vintage wood crate, it is perfect for using on a handmade or found sign. It can be painted on a solid wood board or on slabs that have been attached together. Or paint it on the side of something as I have here.
Whatever material you choose, this tutorial will guide you through the process of making a handmade piece of decor that you can use again and again for your fall decorating.

This post contains affiliate links which means I receive a small commission if you choose to make a purchase using the link, but there is no additional cost to you. For more information, you can view my disclosure policy.

Supplies You'll Need
If you are interested in making this hand painted fall sign, there are a few supplies that you'll need:
- "wood sign" - this can be the side of a wood crate like I've used here, a handmade sign with individual boards attached together, a large single board for a solid sign, or anything else that you feel would make a suitable painting surface.
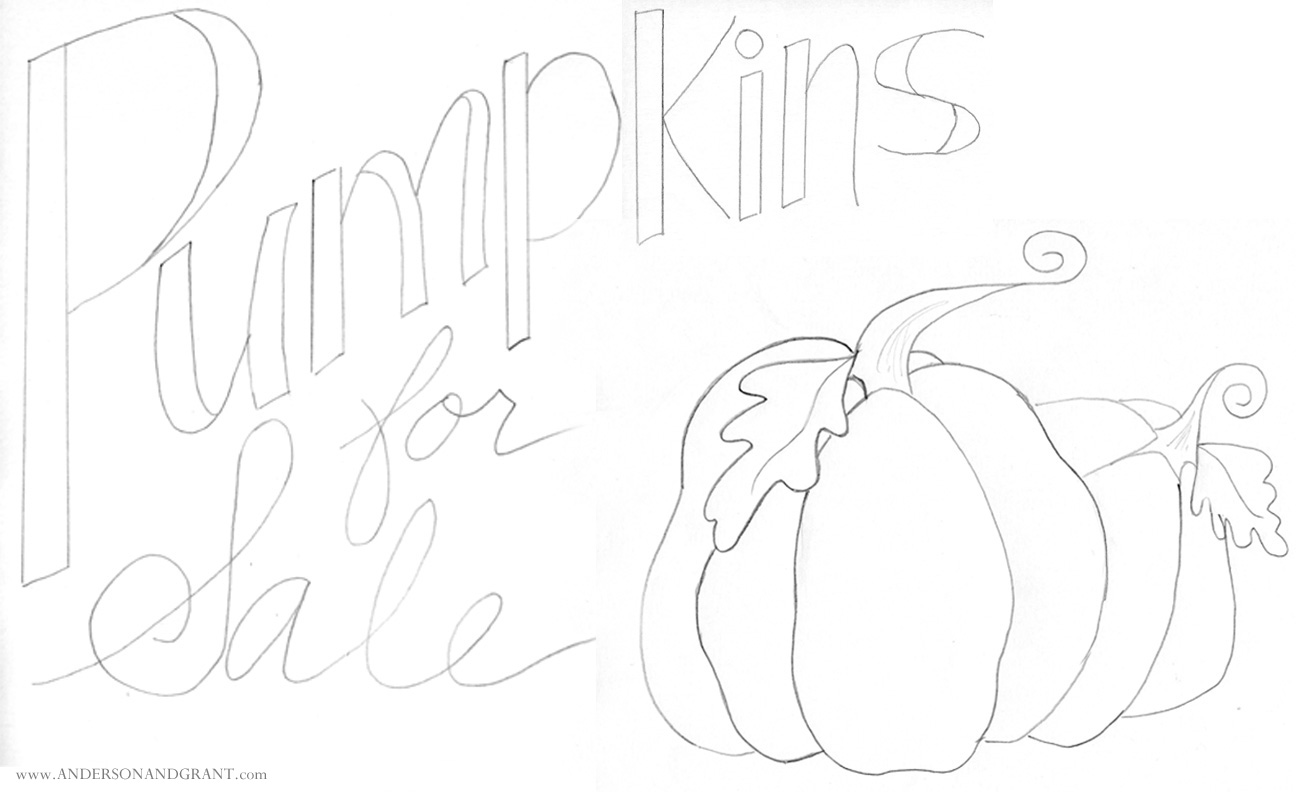
- sign template - download that here
- carbon transfer paper - for transferring the pattern image onto your painting surface
- paint - I used chalk paint, but acrylic craft paint will work fine, too. You'll find the details of the colors I used and how they were applied in the tutorial below
- craft paint brushes - in a variety of sizes
- clear candle - rubbing the wax onto the edges before painting makes distressing really easy
- fine grit sandpaper
- water based sealer - like a polyurethane or craft sealer
How to Get the Right Size Image
You'll likely need a different size image than I've used here depending on what your painting surface is. I've tried to make it as easy as possible for adjusting the sizing.
You'll need to click on the link below to be taken to the image, which you can right click on and save to your computer. Then insert the picture into a Word document and adjust the sizing by pulling the corners of the picture. You may need to print it multiple times moving the image around once it is the right size to make it larger.
You can make the sign as large or small as you'd like.
How to Paint a Rustic Fall Sign
PREPARING YOUR BOARD
I began this project by rubbing the edges of the board I was going to be painting with a clear votive candle. The wax creates a resist and your paint will chip right off when it is sanded. This makes distressing really easy.
I focuses only on the edges, but if you'd like a more distressed look across the whole sign, you can rub the wax over the entire surface.

PAINTING THE BACKGROUND
I followed the wax with one coat of antique white colored chalk paint. I didn't try to cover the entire surface because I want it to be a little rustic and worn. The better you paint a surface, the more work you'll have to distress it later.
TRANSFERING THE IMAGE
Lay the carbon paper down onto your painting surface, place the pattern on top, and trace over the lines using a pencil with consistent pressure to transfer the pumpkin image and words.

PAINTING THE SIGN
When I paint, I don't typically have the patience to do a lot of the floating and shading typically involved with decorative painting. I like to do it all at once and find it easier.
- I began by basecoating my pumpkin in burnt orange, then when it was dry, I painted a second coat of burnt orange and while the paint was still wet, shaded with golden yellow and burnt umber colors to add definition.
- The same was done to the leaves using shades of green and golden yellow.
- For the words, I painted "Pumpkins" with green and "for sale" with burnt umber.

FINISHING DETAILS
After the paint was dry, I added a little shading around the pumpkins and words by dry brushing burnt umber. To dry brush, you'll want to add some paint onto your brush, wipe most of it off onto a piece of paper towel and then brush what remains onto your surface. You're not looking for a solid coat, but rather just a little accent with the paint.
Then I gently rubbed some fine grit sandpaper over the entire piece to wear away the edges and make the painting look worn and aged. I sanded a little extra around the letters of the words to blend the paints together.
Finally, I sealed the entire painted surface with satin varnish to protect the surface. This is especially important if you are placing the work outside where it will be exposed to the elements.
This crate looks great filled with a wool blanket, some pumpkins, and fresh mums. It can even be turned around and used for decorating during another season.

I hope this post has inspired you to pick up a paintbrush and create a rustic sign to decorate with this fall.
PICK YOUR OWN PUMPKINS SIGN - Another great design for a hand painted fall sign
PUMPKIN PLANTER BOX - A beginner's level DIY for constructing a large pumpkin shaped planter
DIY PUMPKINS WITH REALISTIC LOOKING STEMS - Update your dated, worn pumpkins and learn how to DIY a realistic looking stem!
DRIED OAK LEAF WREATH DIY
ACORN WREATH
Other Posts You Might Love
PICK YOUR OWN PUMPKINS SIGN - Another great design for a hand painted fall sign
PUMPKIN PLANTER BOX - A beginner's level DIY for constructing a large pumpkin shaped planter
DIY PUMPKINS WITH REALISTIC LOOKING STEMS - Update your dated, worn pumpkins and learn how to DIY a realistic looking stem!
DRIED OAK LEAF WREATH DIY
ACORN WREATH
