Turn a worn-out child’s chair into a rustic farmhouse accent with this easy chalk paint makeover. Learn how to prep, paint, distress, and wax for a perfectly aged finish that highlights the charm of imperfections. A simple DIY project that proves even the most battered pieces can become beautiful decor.
CREATE | Updated September 9, 2025

CREATE | Updated September 9, 2025
Some pieces are too charming to throw away, even when they're broken, battered, and covered in paint spatters.
That was exactly the case when I came across this tiny child’s chair at an estate sale.
At first glance, most people would have tossed it onto the burn pile. The rungs were broken, the seat was splattered with paint, and the wood was scarred with saw marks. But beneath all that wear, I saw potential and a chance to give this chair a second life as a rustic farmhouse accent.
READ NEXT: See how an antique dresser missing a drawer was turned into a stylish dining room buffet!
Rather than trying to make it look brand-new, I leaned into its imperfections with a simple painted chair makeover that highlights the story already written into the wood. The result? A perfectly distressed piece of decor that feels both authentic and timeless.
At anderson + grant, we believe the beauty of home lies in the imperfect. Simple projects like this remind us that you don’t need a big budget or a brand-new piece of furniture to create something beautiful.
With just a little chalk paint and distressing, you can transform an overlooked find into a meaningful piece of decor.
Supplies You'll Need
If you have your own shabby piece of furntiture that you'd like to give a second life with a makeover, here are some of the things you might want to have:
- Small wooden chair (or any piece with character)
- Sandpaper
- Chalk paint: I used a soft blue-green but choose any color you'd like. My preferred brand is Fusion Mineral Paint that has a built in top-coat or I like to make my own homemade chalk paint.
- Clear candle wax: For easy paint distressing, a cheap taper candle works great
- Antiquing wax
- Soft cloth
- Paintbrush
- Hair dryer: Helps speed drying time

Step-By-Step Painted Chair Makeover
STEP 1: Clean and Prep the Chair
Wipe down the chair to remove dust and dirt. Lightly sand the seat and any areas where old paint splatters or rough patches need smoothing.
STEP 2: Add a Distressing Layer
Rub clear candle wax onto spots where natural wear would occur like edges, corners, and high-touch areas. This will help the paint resist and later chip away more easily.

STEP 3: Paint with Chalk Paint
Apply two thin coats of chalk paint in a light, muted shade. Don’t worry about perfect coverage. Brushing a little unevenly actually enhances the primitive, distressed look. Use a hair dryer between coats if you’d like to speed up drying.

STEP 4: Sand and Distress
Once the paint is dry, lightly sand over the waxed spots and other areas where you want a naturally worn finish. The paint will easily flake away, revealing the wood beneath.
STEP 5: Finish with Antiquing Wax
Rub on a layer of antiquing wax with a cloth to deepen the color and add instant age. Buff lightly to bring out the luster.


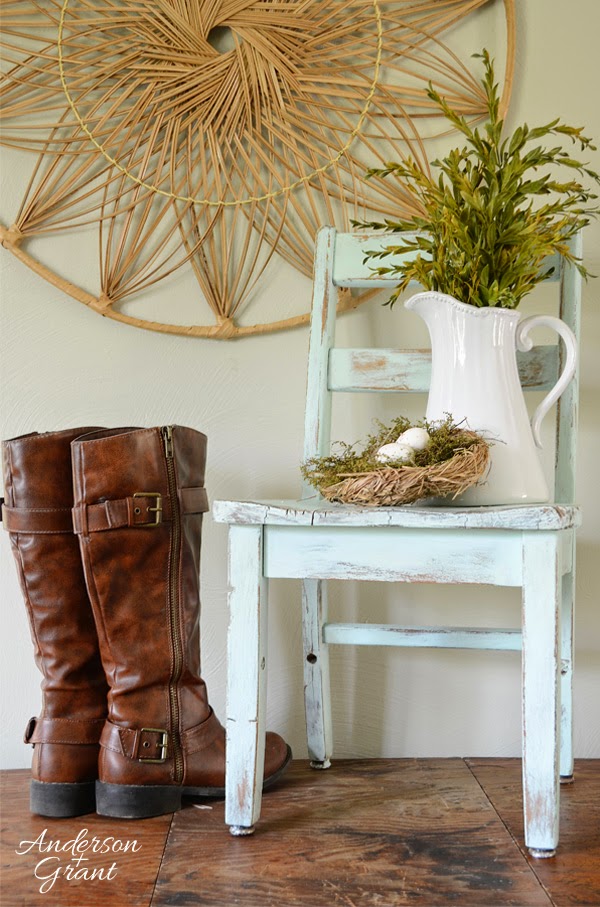
This once-forgotten child’s chair now has the perfect farmhouse patina.
The chipped paint, worn edges, and missing rungs add character rather than taking away from it. While it may no longer be practical for everyday use, it makes a charming decorative piece, perfect for styling in a corner, holding a stack of books, or even displaying potted plants.
What I love most is how simple this project was. With very little time and almost no cost, I was able to give new life to a piece that might have been discarded.
Sometimes the best makeovers happen when you don’t overthink. Just pick up a paintbrush and see where it takes you.
More Painted Furniture Ideas
Second-Hand Table Gets a Reclaimed Wood Makeover
Dining Room Sideboard - Made from an Antique Dresser
Distressed Farmhouse Shelf - Rescued from Grandpa's old workshop
