
A wood recipe box can be easily repurposed into the perfect place to store and organize garden seed packets. Keep reading for the modern farmhouse style DIY transformation and download some free labels to categorize your seeds.
GARDEN | Updated May 19, 2022
If you enjoy starting flowers, vegetables, or herbs from seed, it is likely you have seed packets to store.
They could be seeds you ordered early in the year to be prepared for an upcoming planting, the remainder of a packet to finish using later in the season, or perhaps they are excess seeds you need to save for next year.
Seeds can be stored from one year to the next under proper conditions. And if they are neatly organized so that you can find what you need when you need it, you can spend more time playing in the garden and less time hunting for what you want to plant.

What Can You Use to Organize and Store Seed Packets?
There are different ways to store and organize your packets of plant seeds and as long as they are kept somewhere dark and cool, it is all a matter of preference about what works best for you and the amount of seeds you have to keep orderly.
- I've seen them stored in plastic storage boxes made for organizing photographs..
- There are a variety of large metal storage boxes made specifically for keeping your seeds safe.
- Or maybe you prefer to store them in plastic sleeves in a binder.
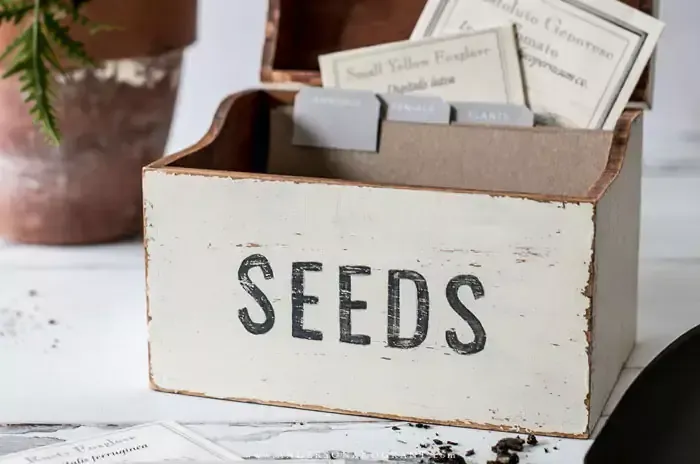
I like things to be pretty as well as functional. When I was cleaning recently I found a wood recipe box I was no longer using and knew that it would be a convenient place to keep all of the seed packets I have in one place.
By repurposing this old box, I was able to personalize it to fit in with my style. It was such an easy DIY project, and really reminds me of something you might see Joanna selling at Magnolia!

HOW TO MAKE A DIY PLANT SEED ORGANIZER BOX
SUPPLIES
- Wood recipe box
- Acrylic Craft Paint
- Small craft paint brush
- SEED template
- Carbon paper
- Fine grit sandpaper
INSTRUCTIONS
STEP 1: If you are using an unfinished recipe box, the first step is to paint or stain the wood as you'd like. I had previously painted my box white and stained the inside, but you can make your box whatever color you love.
STEP 2: When the paint or stain is dry, transfer the word SEEDS to the front of the box using carbon paper and a pencil or pen to trace the letters.
STEP 3: Using a small brush, paint inside the letters you drew on the box with acrylic craft paint. It may take two thin coats of paint to completely fill in the letters. I used a charcoal color (Graphite by Americana), but you can choose whatever will stand out against the finish of your box.
STEP 4: After the paint has dried, gently distress the letters with a fine grit sandpaper to give the letters a slightly aged appearance.


How Do You Organize Seed Packets?
The right way to organize your seed packets is going to depend on how it will be easiest for you to find what you need. Here are some suggestions:
- Sort the seeds into perennial, annual, and vegetable varieties.
- Store them based on when the seeds will need to be started indoors or planted directly outside.
- Divide the plants based on what season they are expected to bloom.
- If you are an avid gardener, it is possible that you have multiple varieties of single seeds like tomatoes like you want to keep together, so you could organize them by specific categories.

Making Your Seeds Easy to Find
In addition to customizing my box to look the way I wanted it to, I also put a personal spin on how my seed packets could be organized and quickly located inside.
I created my own rectangular dividers out of chipboard and then added labeled tabs made on the computer. They were printed onto cardstock and attached with double sided tape. You could also print them on full sheet label paper.
Not only are these dividers useful to keep your seeds separated and in order, but they could also be used as a place to record where and when the seeds were planted, notes about their blooming habits or success you had with the planting. Anything you would want to refer back to next year.
To help you organize your own plant seeds, I'm sharing the tabs I created. There are four different color options for you to choose from (white, light gray, dark gray, and charcoal), so you can either pick one color or mix a few of them up in your box.
DOWNLOAD FREE LABELS TO ORGANIZE SEED PACKETS

HOW TO MAKE SEED ORGANIZING TABS
SUPPLIES
- White cardstock
- Double sided tape
- Labeled divider tabs - (Available in white, light gray, dark gray, or charcoal)
- Chipboard or premade dividers
INSTRUCTIONS
STEP 1: Cut equal sized rectangles made to fit the inside dimensions of your box from the chipboard to create the number of dividers you need to organize your seed packets.
STEP 2: Print out the printable tabs in the color or colors you'd like to use onto white cardstock. Carefully trim out the labels that you want with scissors.
STEP 3: Fold the tabs in half. You can use either a bone folder or your fingernail to get a crisp fold. The blank area under the typed word has been made a little longer than you may need depending on how far up you want the label to be placed on the chipboard divider. The bottom can be trimmed down if you desire to do so.
STEP 4: Before attaching the tabs to the dividers you need to figure out where the bottom should be positioned so that they all line up with one another and also how you would like the tabs to be spaced across the top of the dividers. I chose to have tabs in four locations, but you may want more or less. Make a couple small dots with a pencil where the tab should be attached.
STEP 5: Add three short pieces of double-sided tape to the inside of each label - a piece should be placed in the middle and at both bottom ends. This is what will attach the label to the chipboard divider and will tape the top portion to itself creating a sturdy tab.
STEP 6: Fold the labels over the top edge of the chipboard divider where you've measured for it to be and press firmly to securely attach everything together.
STEP 7: Add the handmade labeled dividers to your seed storage box and begin filing your packets! If you are adding packets that have been opened, be sure to tape them shut to ensure the seeds do not fall out into the box.


DIY Seed Storage Boxes Make a Great Homemade Gift Idea
Making a custom seed storage box is a thoughtful and useful gift idea that anyone who likes to garden would appreciate.
- This seed storage box would make a great gift for mom on Mother's Day if she loves spending time in the garden. Fill it with the handmade dividers and some of her favorite flower seeds.
- It would also be an easy project to make as a housewarming gift for a friend or family member when they move into a new home.
- Looking for something other than a bottle of wine or fresh flowers to give as a hostess gift? This is a great alternative for friends and family who like planting seeds.
If it is for a gift, I love shopping for flower seeds that come in pretty packaging because I think the beauty of the packet is part of the gift. Some of my favorite places to shop for vegetable and plant seeds are Monticello Shop, Floret Flowers, and Magnolia.
The packets you see in this post with the vintage inspired botanical pictures came from Monticello Shop which is set up to sell heirloom plants through President Thomas Jefferson's Center for Historic Plants.

Whether you update a new recipe box or one that you have not been doing like I've done here, this simple DIY project will help you to be a more organized and successful gardener if you like to plant your own seeds.
READ NEXT: Hand Tools You Need to Be a Successful Gardener

READ NEXT: Hand Tools You Need to Be a Successful Gardener
