
Good morning friends! Today I'm sharing another simple DIY with you. My mind is always trying to figure out how to use common supplies in different ways. This hardware cloth vase uses, well, hardware cloth! In case you've never heard of this product before, it is a wire mesh fabric that comes in a roll. As with ordinary wire, hardware cloth comes in different gauges (or thickness). It can be purchased at any hardware store or online. I found mine at my local Lowes in the outdoor landscaping section.

I originally came up with the idea for this vase when I was working on transforming my picnic basket. I was trying to be creative and figure out something to do with the handles of the basket, but the idea didn't work out. The wood of the handles was too thick to bend enough, even after letting it soak. I didn't want to just abandon the idea, though. It just needed to be altered. When projects don't work out, you just have to keep trying and adjusting until it does work!

My favorite part of this project is that I think these vases can fit into multiple styles of decor. They really have a farmhouse, industrial kind of look to them with a modern little twist. Would you agree?

HOW TO MAKE A HARDWARE CLOTH VASE
Here are the supplies you'll need for this craft:
Hardware cloth
1" wide flat basket reed (I tore apart a basket made of the flat, thin wood which worked, too)
Basic glass vase (I bought mine at Dollar Tree)
Hot glue
Bulldog/Binder clips

I began by tearing my basket apart so that I are left with strips of flexible wood. This step can be skipped if you purchase the flat basket reed.
You'll need to soak the wood for about an hour in water to make it more flexible.

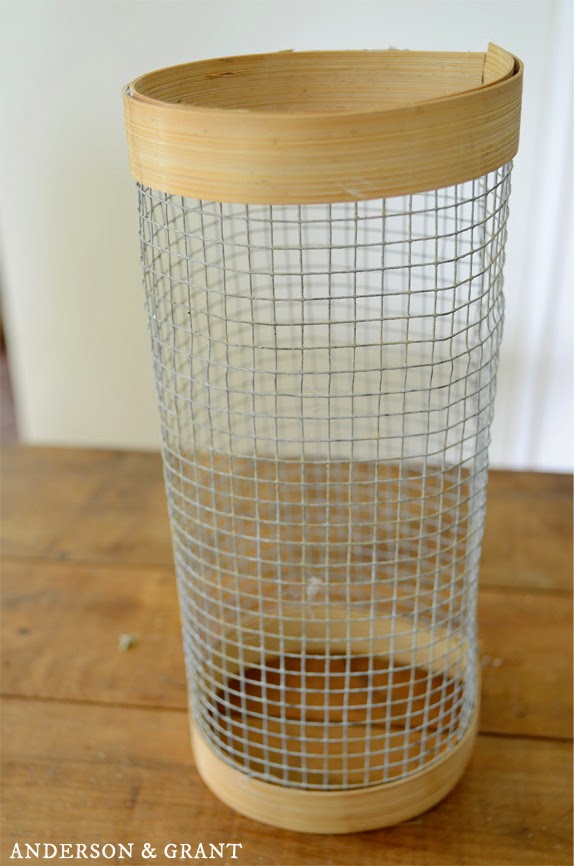
While the wood is soaking, you can create the hardware cloth frame of the vase. I cut my hardware cloth into a rectangle 12 inches wide by 8 inches tall with wire cutters. You can make this as large or small as you need to hold the vase that you have. The cloth should be cut slightly wider than the measurement around your vase and slightly taller than the height.
Also, when you cut the cloth, be sure to cut one side smooth and one side with the metal pieces sticking out. These will be used to wire one side of the cloth to the other to form the round shape.

Roll the wire mesh into a cylinder and use a binder clip on each end to hold the sides together. Using wire cutters and tweezers, fold the wire pieces that are sticking out around the smooth side and loop it around until the wire is no longer peeking out. You may want to wear gloves while working with the hardware cloth because it can be rough on your hands.

When your wood has soaked long enough to be flexible, it can be removed from the water. You'll need to cut four strips that are a little longer than the measurement around your wire frame. Wrap the strips around the top and bottom of the frame and attach them with binder clips. When the wood has dried, it will stay in the shape of the vase.

When the wood has dried, it is time to glue everything together. Take one piece of the trim and insert it into the inside of the wire frame along the edge. It may seem like it is longer than you need, but do not trim the piece of wood yet. Use a second piece of the wood for the outside. Using a hot glue gun, work slowly attaching the trim on the outside. The glue will seep through the wire mesh to the trim on the inside, attaching everything together. As you get close to the end of the pieces, carefully cut the wood trim so that it meets up with where you started gluing. Be careful that you keep the trim straight and level across the top of the wire frame as you glue so that the pieces meet in the end. You'll notice from the picture below I learned that this is important by experience!
Repeat this process along the bottom edge of the wire frame with two more pieces of trim.
When your wood trim is attached, insert your glass vase and you are done!

The thing that it really great about this project is that it doesn't just create a pretty vase. It can also be used to hold a pillar candle. Or it can even sit on your kitchen counter to hold wooden spoons and kitchen utensils.

As with many DIY projects, this vase can be customized to be totally your style. The wood trim can be stained or painted. Paint some stripes or polka dots. You can even add some glitter if glitz is your thing. You can make one or many. Wouldn't a group of them down the center of a dining table look great?
If you purchased the flat reed to make this project, be sure to check out my post on how to make DIY tobacco baskets to use the rest of it up!

So what are your thoughts of my vase?