CREATE | Published August 16, 2013

Do you ever start a project and find that things just don't go well? I'm not a very patient person, and I typically get an idea, begin the project expecting it to go fast and perfectly, and then get frustrated when things don't work out that way. I can probably count on my two hands the times my projects have gone as originally planned. Can you agree?
About a month ago, I went to an estate sale and picked up this table, in addition to MANY other things.
I knew when I saw the piece that it would be coming home with me before I even asked the price. Although it was in rough shape, I fell in love with the turned wooden legs and shape of the table.

The problem was, though, that as much as I loved parts of the table, there was a lot more NOT to love. The wooden piece at the bottom connecting the front leg to the back had broken where the joints joined together. Some of the veneer was chipped and pulled away in places. The finish on the top was totally worn in places. Worst of all, there were two small spots in the middle where the veneer was raised, but not enough to get glue under to push it back down.

I decided that this could be a piece I could experiment with, and boy, did I ever! I went through a lot of sandpaper, had "stain-dust" all over the place, and suffered quite a bit of frustration. I put a lot of time and elbow grease into getting this table to look like I wanted it to, and not that it's done, I couldn't be happier.
>Today's post is about being okay with experimenting and having things NOT turn out the way you want them to. Things you try will not always work. Sometimes you have to do something over again, and in my case, over a third time. Sometimes you have to think outside the box in order to fix a problem.
There will be times when you try something that seems strange, but it works so well that you want to share it with others. That is all part of the DIY process, and quite frankly, part of life. What you can't do is give up when something doesn't work. Take some time away, regroup, and try again. Eventually things will work out and you'll be so glad when they do.
That's my inspirational message of today....keep trying.
So Here's what I did to update this table:
I began by chipping off the veneer that was too damaged to save, like on the scroll cut area in the front. Underneath was wood, so I wasn't worried about taking the veneer off. I used a putty knife to pry underneath the chunks of veneer. This was probably the easiest part of the job.

Then I sanded the top. Well, I tried to sand the top, but I wasn't really getting anywhere. So, I tried to use some paint stripper, but oddly enough, that didn't work either. I finally opted for using my putty knife to scrape the finish off. I'm not kidding. While I know this isn't what they mean, my table really does have a hand scraped wood finish. The top already had some nicks in it, so I wasn't too worried about using the metal tool gently on the top, but I wouldn't recommend this on a priceless antique you're trying to save.

Using some clamps and wood glue, I attached all the pieces of veneer that I didn't remove back together with the wood.

Another trial and error process involved ironing the veneer back on the top. I had read previously that something like this could be done, but didn't totally believe it. What could it hurt, though? I just ran the iron over the raised portion and heated it until the veneer was pushed back down. There is still a slightly raised portion, but nothing that affects the actual use or visual aesthetic of the table.
I've never finished a piece of furniture like this before, but I decided to try staining the top and painting the bottom. The top had been sanded and didn't look bad, but wasn't in a condition to just seal it. I put a coat of stain on the tabletop, and while I liked the color, the finish seemed a little splotchy. So, I got my sand paper back out, sanded the finish off, and stained it again. Much better (or so I thought...keep reading)

I'm impatient and couldn't wait until I went shopping to get the green paint I wanted, so I turned a bottle of acrylic craft paint into chalk paint. It worked perfectly and I got the color I wanted....light avocado.

I rubbed wax over the edges of the table before I painted it with two coats of the paint. Then I sanded the edges where I had added the wax to remove the paint, sealed it with a clear varnish, and stained the piece with an antiquing glaze.

I also used the clear varnish on the top, and in random places the varnish left a white glaze on the finish. I rushed to get a damp rag to wipe away the varnish, which normally works, but this time it made the problem worse. Unfortunately, I had to sand off the finish for a third time and this time, the more I sanded, the more it seemed like I needed to sand. Obviously the previous owners of this table were looking down on me and NOT liking the stained top! After resanding for about an hour, I was finally down to the bare wood surface and decided to just seal the wood as it was and not stain it. I actually like it much better this way (I just didn't enjoy the process of getting it to this state!).


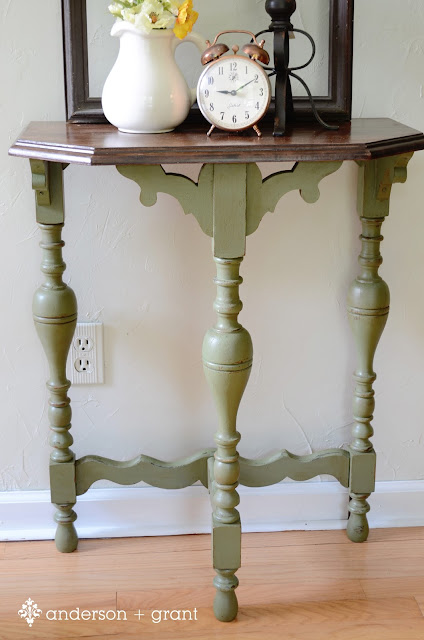

Doesn't that wood top look great?!?!?!
So that is my multi-step experiment in refurbishing a table. Although I can't say I thoroughly enjoyed all the steps of this process, I couldn't love the finished product any more than I do. It turned out just like I wanted and I learned some interesting DIY tips along the way!